
How to Accept Parameter Files Downloaded from TMS: Difference between revisions
| Line 31: | Line 31: | ||
=== Permission === | === Permission === | ||
android.permission.CLOUDPOS_PUSHSERVICE | android.permission.CLOUDPOS_PUSHSERVICE | ||
The application declares the | android.permission.CLOUDPOS_DOWNLOADRVICE | ||
The application declares the permissions in manifest. | |||
=== Register BroadcastReceiver === | === Register BroadcastReceiver === | ||
Revision as of 06:29, 1 March 2023
How to configure parameter file in WizarView
Please refer to the WizarView specification.
Configure any format parameter file
- Add a new parameter file name in WizarView.
- Click Applications > Application.
- Click + icon in the left bottom of the tool box, popup an edit window.
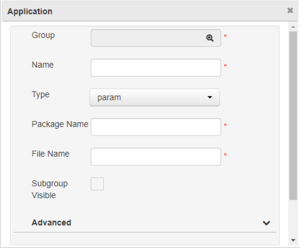
- In the edit window, input the name and other input area, then select type param.
- Input the package name which will receive the parameter file and input parameter file name.
- Click Commit button.
- In the Applications>Application page, choose param type, then click Search button.
- Select the parameter file name in the list.
- Select config icon in the right bottom of the tool box.
- Select Upload button in the popup window.
- Choose the upload file, then click Commit button.

The parameter file is configured in WizarView now. The process of push file is the same with push application.
Configure parameter file with template

- Select Templates > Configuration File, then click (+) icon in the left bottom of the tool box, in the popup window, choose group, input the name and other input area, choose the configuration file, click Commit button.

Here is a example of the configuration file, testparam, in configuration file, all type should be string, the others should change depends on your real requirement.
- Select Templates > Template, then click (+) icon in the left bottom of the tool box, in the popup window, input the name and other input area, select the configuration file created in the first step, input the package name of the app which will accept the template parameter.

- Select Terminals>Terminal, select the serial number of the POS you want to push template parameter.
- Select Config Application parameter icon in the bottom toolbox, in the popup window, click Add button in the left bottom, select the template parameter created and modify the value in the UI, then you can push it like push an app.

How to receive parameter files in applicaion
Follow the instructions below to write the application to receive the parameter file. If the application is installed for the first time, you need to run it to register the broadcast receiver. After that, even if it is not running in the background, it will be triggered when you push the parameter file and press "Settings - > About POS - > POS Configuration - > Update now" on the terminal.
Permission
 android.permission.CLOUDPOS_PUSHSERVICE
 android.permission.CLOUDPOS_DOWNLOADRVICE
The application declares the permissions in manifest.
Register BroadcastReceiver
Use android BroadcastReceiver to get pushing notice. Here is the demo:
<!-- permission -->
<uses-permission android:name="android.permission.CLOUDPOS_PUSHSERVICE" />

<!-- receiver -->
<receiver
android:name="com.xxx.xxx.receiver.XXBroadcastReceiver">
    <intent-filter>
    	<action android:name="your package name" />
</intent-filter>
</receiver>

public class ParamFileReceiver extends BroadcastReceiver {

		private static final String MSG_TYPE_PARAM = "param:";
		@Override
		public void onReceive(Context context, Intent intent) {
			String notification = intent.getStringExtra("notification");
			if (notification != null
	&&MSG_TYPE_PARAM.equals(notification.subSequence(0,
MSG_TYPE_PARAM.length()))) {
				// remove unnecessary characters
				String fileName = notification
                                      .substring(MSG_TYPE_PARAM.length());
			}
		}
	}
}
Please notice that the pushed information has a type field, it is used to distinguish the third-party information pushed.
Get downloaded file name
Use BroadcastReceiver to get parameter file's name. And use ContentResolver to get file stream. Here is the demo:
String URI_PARAM_FILE = "content://com.wizarpos.wizarviewagent.paramfilesprovider/file/";

Uri uri = Uri.parse(ParamFileProvider.URI_PARAM_FILE + fileName);
ContentResolver resolver = context.getContentResolver();
Reader reader = null;
try {
	reader = new InputStreamReader(resolver.openInputStream(uri));
} catch (FileNotFoundException e) {
e.printStackTrace();
}
The callback of the result of distribute parameters
Send the distributed result to WizarView, WizarView will decide weather the parameter file is completed. If completed, stop the push. Otherwise, it will push all the time.Here is the demo:
public static final String KEY_READED = "readed";
public static final String KEY_ERRLOG = "errlog";

String URI_PARAM_FILE = "content://com.wizarpos.wizarviewagent.paramfilesprovider/file/";

Uri uri = Uri.parse(ParamFileProvider.URI_PARAM_FILE + fileName);
ContentResolver resolver = context.getContentResolver();
ContentValues vaules = new ContentValues();

vaules.put("readed", true);
vaules.put("readed", false);
vaules.put("errlog", "Error in parameter information.Can not apply");

// give the result to the server
Uri resultUri = resolver.insert(uri, vaules);
if(resultUri == null){
	Log.e(APP_TAG, "param happen error , you need check log for modify this question!");
}
Sample
Please download the whole project demo