How to Understand the Counter Mode Functionality in the Q3 Terminal: Difference between revisions
No edit summary |
|||
| Line 1: | Line 1: | ||
== Why | == Why Counter Mode is Necessary: == | ||
Q3 | * The Q3 terminal utilizes a soft battery. | ||
* Continuous charging, especially when the battery is already fully charged, can lead to battery bulging. | |||
== How to | * To mitigate this risk, software adjustments are made to the charging mechanism. | ||
* Counter Mode is essential when the charger is constantly connected to the terminal. | |||
* In Counter Mode, the battery recharges at 15% (rather than the usual 95%) to avoid long-term full charge. | |||
=== | == How to Activate Counter Mode: == | ||
* | There is the auto-counter mode algorithm in the Q3 terminal. | ||
* | === Manual Activation in Terminal Settings: === | ||
=== | * Navigate to Settings > Administrator Login. | ||
Install the | * Go to Setting > Battery. | ||
* [http://ftp.wizarpos.com/advanceSDK/ChargeCounter-release-v3.0.2_counter_on-r20230823172106-q1_platform.apk APK to turn on Counter Mode(updated 8/28/2023)] | * Toggle Counter Mode on or off as needed. | ||
* [http://ftp.wizarpos.com/advanceSDK/ChargeCounter-release-v3.0.2_counter_off-r20230823164102-q1_platform.apk APK to turn off Counter Mode(updated 8/28/2023)] | === Activation via APK Installation: === | ||
* Install the specific APK to automatically set the terminal to Counter Mode. | |||
=== | * This APK disables the auto-counter mode algorithm, allowing for unconditional Counter Mode activation. | ||
* | * No app icon is displayed on the launcher desktop. | ||
* Two versions of the APK are available: one to turn on Counter Mode, and another to turn it off (both updated as of 8/28/2023). | |||
** [http://ftp.wizarpos.com/advanceSDK/ChargeCounter-release-v3.0.2_counter_on-r20230823172106-q1_platform.apk APK to turn on Counter Mode(updated 8/28/2023)] | |||
** [http://ftp.wizarpos.com/advanceSDK/ChargeCounter-release-v3.0.2_counter_off-r20230823164102-q1_platform.apk APK to turn off Counter Mode(updated 8/28/2023)] | |||
=== Activation via TMS (Terminal Management System): === | |||
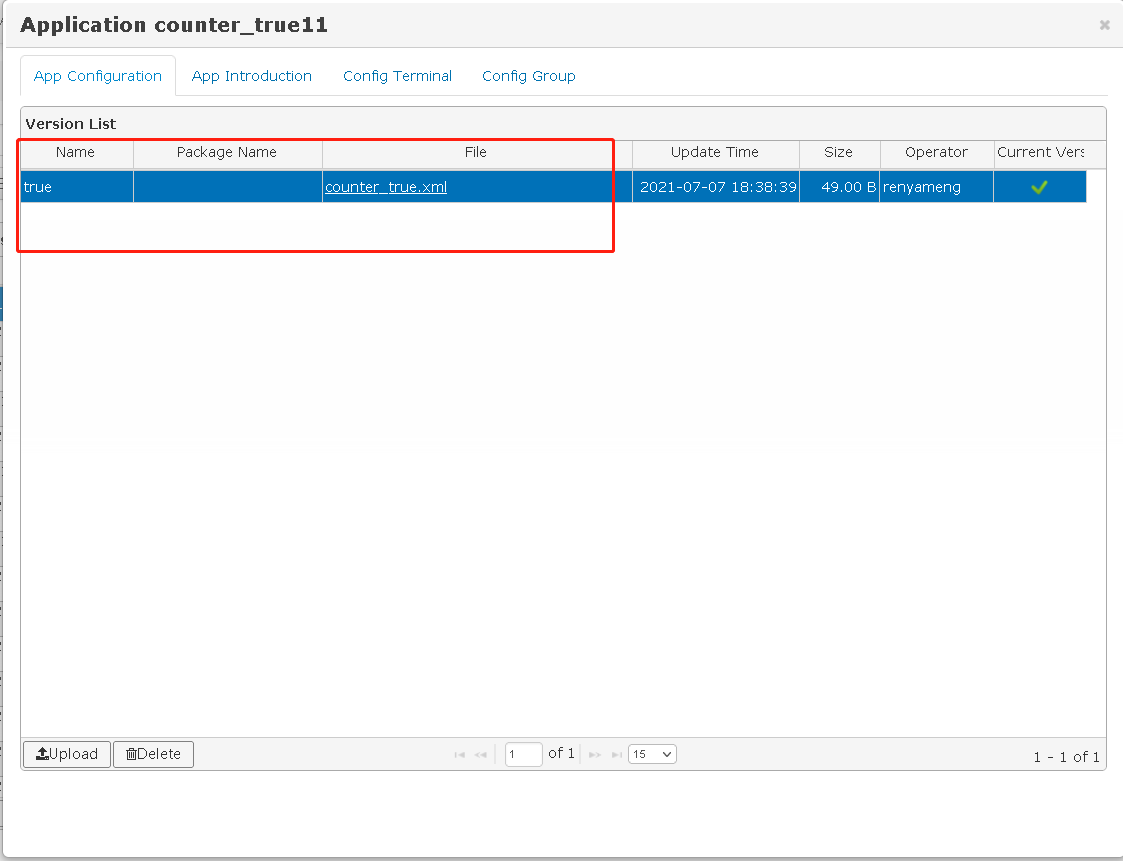
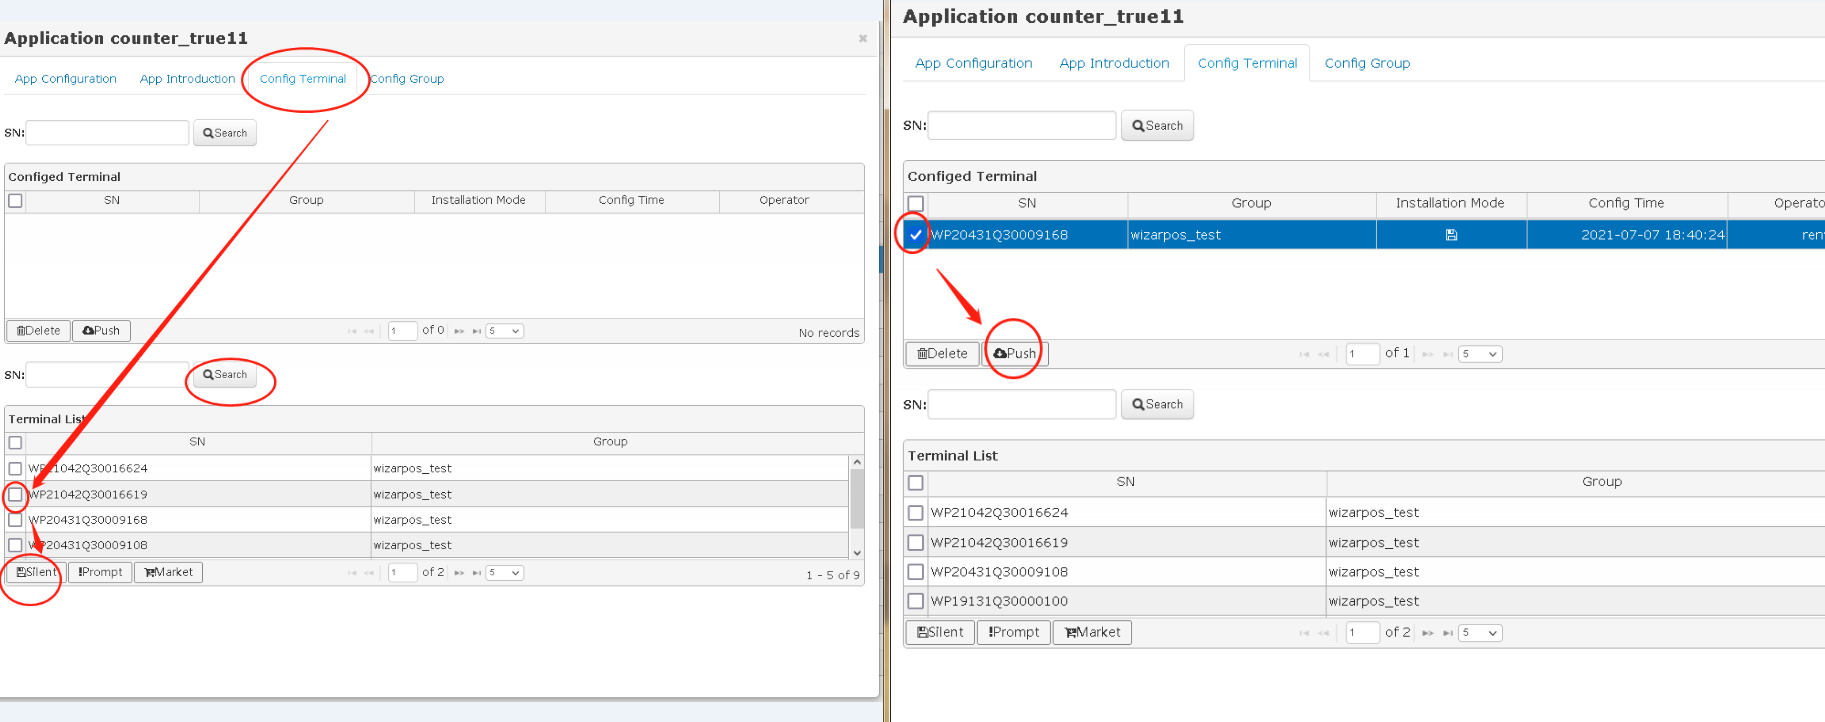
* Add a new parameter file in WizarView. Follow steps in the WizarView application to upload and commit the parameter file. | |||
** '''Access Application Settings:''' | |||
*** Navigate to the 'Applications' section, and then select 'Application' from the submenu. | |||
** '''Add New Parameter File:''' | |||
*** Click the '+' icon located at the bottom left of the toolbox. This will open an edit window. | |||
*** In the edit window, fill in the required fields, including the name of the parameter file. | |||
*** Ensure to select 'param' as the type. | |||
*** Enter the package name, which should be 'com.wizarpos.system.settings', and then the name of your parameter file. | |||
*** After entering all the details, click the 'Commit' button to save this entry. | |||
** '''Locate the New Parameter File:''' | |||
*** Now, click the 'Search' button in the 'Applications > Application' page. | |||
*** From the displayed list, select the parameter file you just added. | |||
** '''Configure the Parameter File:''' | |||
*** Click the configuration (config) icon located at the right bottom of the toolbox. | |||
*** In the popup window, click the 'Upload' button. | |||
** '''Upload the Parameter File:''' | |||
*** Choose the appropriate parameter file from your device. | |||
*** Once selected, click the 'Commit' button to upload the file to the system. | |||
* This allows the configuration of the terminal remotely via file push, similar to application updates. | |||
[[File:3_upload_success.png]] | [[File:3_upload_success.png]] | ||
[[File:4_push_parm.png]] | [[File:4_push_parm.png]] | ||
* Parameter files are available to turn on or off Counter Mode. | |||
* Parameter | ** [http://ftp.wizarpos.com/advanceSDK/counter_true.xml Sample paramter file to turn on Counter Mode] | ||
** [http://ftp.wizarpos.com/advanceSDK/counter_false.xml Sample parameter file to turn off Counter Mode] | |||
=== Activation through API (Application Programming Interface): === | |||
=== | * Add the required permission, ''''<uses-permission android:name="android.permission.CLOUDPOS_SET_BATTERY_COUNTER_MODE" />'''' in ''''AndroidManifest.xml''''. | ||
* Utilize the [http://ftp.wizarpos.com/advanceSDK/ISystemExtApi.aidl AIDL file] in the package ''''com.wizarpos.wizarviewagentassistant.aidl''''. | |||
* A code sample can be provided for this purpose. | |||
<syntaxhighlight lang="java">public void systemExtApiService_setBatteryCounterMode(Context context, boolean enable) { | <syntaxhighlight lang="java">public void systemExtApiService_setBatteryCounterMode(Context context, boolean enable) { | ||
ServiceConnection systemExtConn = new ServiceConnection() { | ServiceConnection systemExtConn = new ServiceConnection() { | ||
| Line 61: | Line 70: | ||
context.startService(intent); | context.startService(intent); | ||
}</syntaxhighlight> | }</syntaxhighlight> | ||
By using Counter Mode in the appropriate situations, the lifespan and health of the Q3 terminal's battery can be significantly enhanced. | |||
Revision as of 18:07, 3 January 2024
Why Counter Mode is Necessary:
- The Q3 terminal utilizes a soft battery.
- Continuous charging, especially when the battery is already fully charged, can lead to battery bulging.
- To mitigate this risk, software adjustments are made to the charging mechanism.
- Counter Mode is essential when the charger is constantly connected to the terminal.
- In Counter Mode, the battery recharges at 15% (rather than the usual 95%) to avoid long-term full charge.
How to Activate Counter Mode:
There is the auto-counter mode algorithm in the Q3 terminal.
Manual Activation in Terminal Settings:
- Navigate to Settings > Administrator Login.
- Go to Setting > Battery.
- Toggle Counter Mode on or off as needed.
Activation via APK Installation:
- Install the specific APK to automatically set the terminal to Counter Mode.
- This APK disables the auto-counter mode algorithm, allowing for unconditional Counter Mode activation.
- No app icon is displayed on the launcher desktop.
- Two versions of the APK are available: one to turn on Counter Mode, and another to turn it off (both updated as of 8/28/2023).
Activation via TMS (Terminal Management System):
- Add a new parameter file in WizarView. Follow steps in the WizarView application to upload and commit the parameter file.
- Access Application Settings:
- Navigate to the 'Applications' section, and then select 'Application' from the submenu.
- Add New Parameter File:
- Click the '+' icon located at the bottom left of the toolbox. This will open an edit window.
- In the edit window, fill in the required fields, including the name of the parameter file.
- Ensure to select 'param' as the type.
- Enter the package name, which should be 'com.wizarpos.system.settings', and then the name of your parameter file.
- After entering all the details, click the 'Commit' button to save this entry.
- Locate the New Parameter File:
- Now, click the 'Search' button in the 'Applications > Application' page.
- From the displayed list, select the parameter file you just added.
- Configure the Parameter File:
- Click the configuration (config) icon located at the right bottom of the toolbox.
- In the popup window, click the 'Upload' button.
- Upload the Parameter File:
- Choose the appropriate parameter file from your device.
- Once selected, click the 'Commit' button to upload the file to the system.
- Access Application Settings:
- This allows the configuration of the terminal remotely via file push, similar to application updates.
- Parameter files are available to turn on or off Counter Mode.
Activation through API (Application Programming Interface):
- Add the required permission, '<uses-permission android:name="android.permission.CLOUDPOS_SET_BATTERY_COUNTER_MODE" />' in 'AndroidManifest.xml'.
- Utilize the AIDL file in the package 'com.wizarpos.wizarviewagentassistant.aidl'.
- A code sample can be provided for this purpose.
public void systemExtApiService_setBatteryCounterMode(Context context, boolean enable) {
    ServiceConnection systemExtConn = new ServiceConnection() {
        @Override
        public void onServiceConnected(ComponentName name, IBinder service) {
            ISystemExtApi systemExtApiService = ISystemExtApi.Stub.asInterface(service);
            Logger.debug("startAgentService = " + systemExtApiService);
            try {
                systemExtApiService.setBatteryCounterMode(enable);
            } catch (RemoteException e) {
                e.printStackTrace();
            }
        }

        @Override
        public void onServiceDisconnected(ComponentName name) {
        }
    };
    ComponentName comp = new ComponentName("com.wizarpos.wizarviewagentassistant","com.wizarpos.wizarviewagentassistant.SystemExtApiService");
    Intent intent = new Intent();
    intent.setComponent(comp);
    context.bindService(intent, systemExtConn, Context.BIND_AUTO_CREATE);
    context.startService(intent);
}
By using Counter Mode in the appropriate situations, the lifespan and health of the Q3 terminal's battery can be significantly enhanced.


